Thursday 31 July 2014

Nail Tutorial - Butterfly


Butterfly Nail Art

Let's have fun with Fluttering Butterflies...


This is a tedious nail art.

I'm going to break it down into 3 parts.


Part 1 
Two tone Gradient Nail ...


Things you need:

  1. Clear Base Coat & Top Coat 
  2. 2 tones of any colour nail polish (today I'm using yellow and orange)
  3. White Nail Polish
  4. Foundation sponge (I use flat foundation sponge instead of the triangle ones, I find that it's easy with this. You can try both and see which works for you, works fine with both)
  5. Thick brush 
  6. Nail polish remover that contains alchohol 
  7. Medium Thickness and super thin brush
  8. Dotting tool
  9. Black and White Acrylic paint
  10. Plastic base (I use a plastic food cover)


Here's how:

  Preparation - always start with clean manicured nails. Go to Basic Home Manicure.
  Step 1 - Apply Base Coat to all nails 
                   Apply one coat of white nail polish
  Step 2 - Loosen both the nail polishes for fast application.
                   - Bend the foundation sponge into half to create a curve and apply each 
                     colour onto the sponge be creating thick strips. You might need to go 
                     through each strip twice depending on how thick the nail polish is.
  Step 3 & 4 - Align the foundation sponge to your nails and roll the sponge over your 
                            white painted nail
                   - Repeat application to sponge and onto nails 
                   - Repeats the process over 2 or 3 times to achieve brighter colours.
                     *note: it's easier to gain brighter colours when the first layer/previous layer 
                      has been left 1 min to dry 
 Step 5 - Dip your Thick brush into nail polish remover and gently remove the  
                        unwanted nail polish at sides of nails
 Step 6 - Apply top coat and leave nail to dry.


Part 2
Drawing the Butterfly Wing


Here's how: 

 Preparation -  Squeeze out Black acrylic paint onto a plastic base, have a cup of 
                                  water ready and a thin brush
 Step 7 - Dip brush into water (do not remove excess water from brush) and dilute 
                    acrylic paint by smearing and mixing
 Step 8 - Draw an oblong shape on right side of nail
 Step 9 - Draw a smaller oblong shape on the left of nail, this oblong should have a 
                    flat base
 Step 10 - Paint black on all the negative space
 Step 11 - Allow it to dry.

*note: you could experiment with different shapes for your wings and the number of shapes per nail.


Part 3
Finishing the butterfly wings


Here's how: 

 Preparation - Squeeze out White acrylic paint onto plastic base, dip a clean brush 
                              into water and dilute acrylic paint
 Step 12 - Using the big dots side of a dotting tool, dip into acrylic paint and add 
                      dots randomly on the top of the nail (only on the black painted area)
 Step 13 - use the smaller dots side of the dotting tool, dip into acrylic paint and
                      add smaller dots onto sides of the oblong shapes and in between the  
                      bigger dots
 Finish - Leave the paint to dry for about 5mins and apply top coat.

Voila!
Hope you will have fun 

Let Butterfly Nails be your bestfriend


Faith.Love Feline


Sunday 20 July 2014

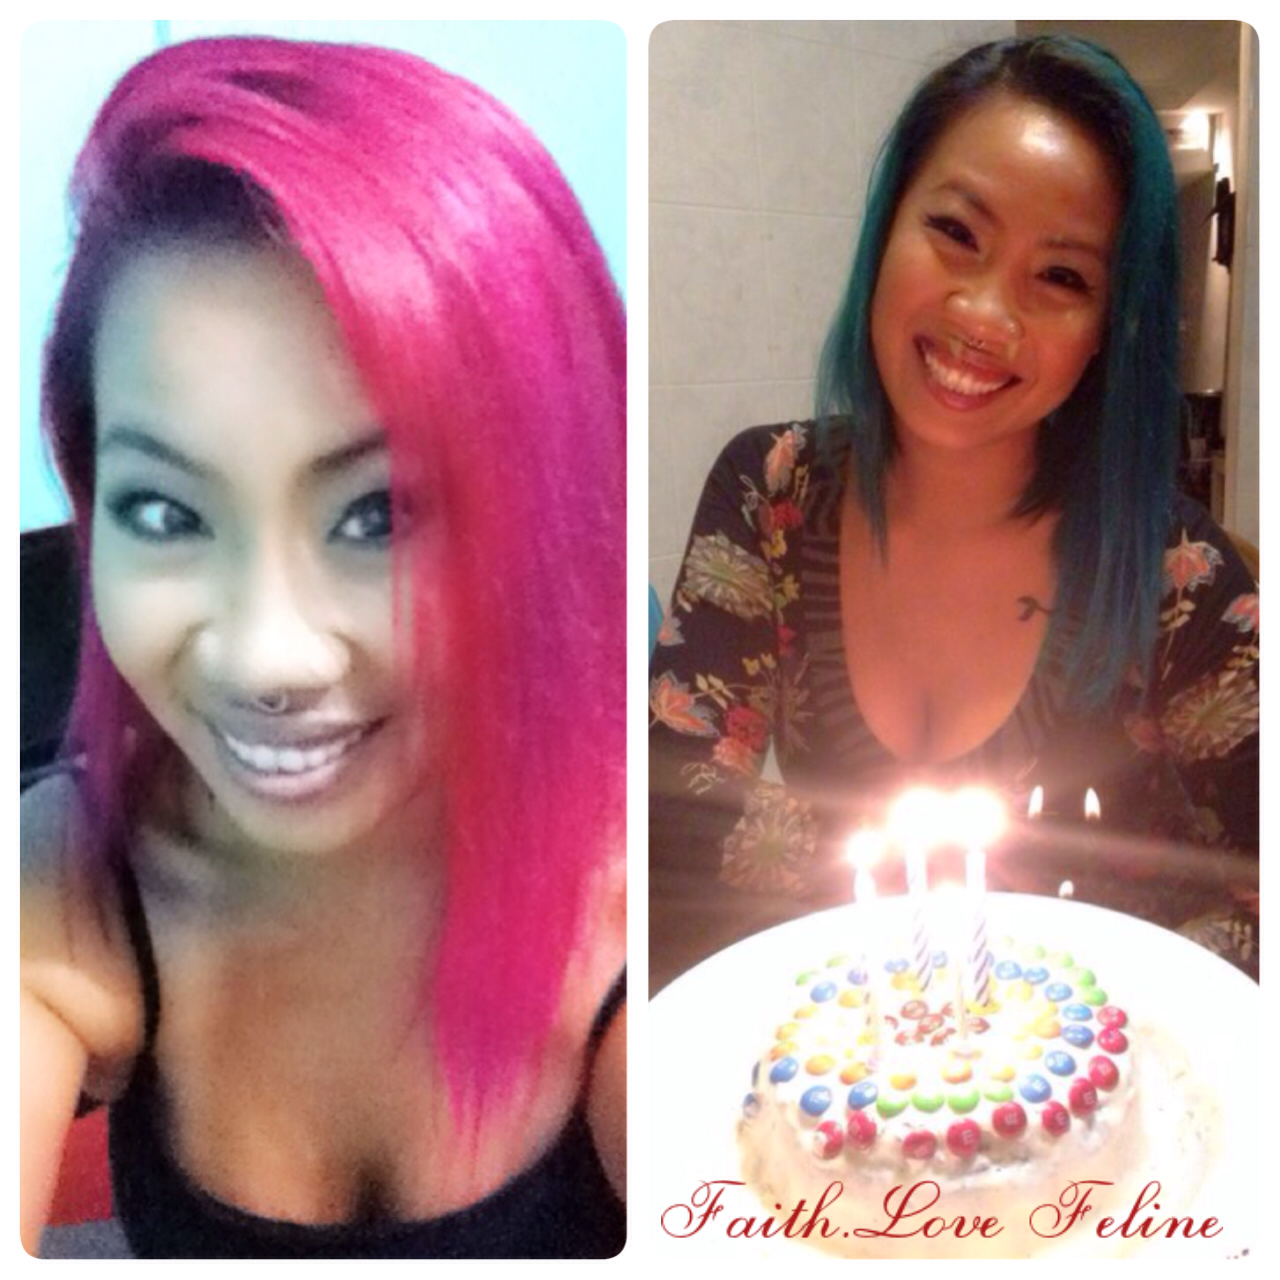
Hair - Changing Manic Panic colours


Changing Manic Panic Colours


Hello Felines!

Manic Panic is such a cool hair dye that leaves you wanting to explore more. It sure did for me. I dyed Cleo Rose a couple of months ago and only recently I went to turquoise using Atomic Turquoise. 

I needed to change my colour within a week before my birthday. A new look, a new beginning. Desperate, I went online and found an amazing site (click here for amazing site) that gave me 10 options to choose. 

One problem.

Most products such as Colour Reducers or Colour Strippers are not sold in Singapore. I could get them off amazon or eBay but I need it ASAP.  So I was left with only 6 out of 10 options. Choose 2 ways to remove my entire Cleo Rose colour and succeeded.

Here's what and how:

1. Anti-Drandruff Shampoo.

    - Head & Shoulders Shampoo
    - apply generously and lather. Your foam will immediately turn coloured. Rub your hair gently
      with the foam, encouraging the shampoo to work.
    - wash off and apply generous amount of conditioner. Because your hair had been bleached and
      this shampoo strips and cleans any residue, it leaves your hair super coarse.

This process works very well but it requires a week to get colour completely off. It is gently on hair meaning it doesn't weaken hair strands like bleach would. I was desperate as time was not on my side hence I tried another method.


                                                                   Mixed Mixture

2. Bleach Bath

    - mix 3tbsp of Head & Shoulders shampoo to 1tbsp of conditioner, ratio 3:1 (pic 1 & 2)
    - mix 3tbsp of bleach powder to 3tbsp of peroxide, ratio 1:1 (pic 3 & 4)
    - mix both mixture together
    - apply to hair. Apply like you would if you were dyeing your hair or you could click here to read
      my blog on dyeing hair.
    - secure hair up in a bun
    - cover with shower cap or cling wrap
    - leave it for 30mins or till colour lightens
    - wash off 

*do not allow the bleach to touch your scalp

The measurement I gave is for shoulder length hair, do add more as it only works when hair is fully covered by mixture. Mixture consistency should be thick watery, not stiff and dry.

The surprise came when I wash off the mixture from my hair. My toilet was filled with red dye. 98% of the hair dye was completely taken off. 

Do take note! This process, Bleach Bath, has bleach in it. Your hair colour will lighten up 1-2 shades. And after the process, please deep condition your hair.

Where to buy:
  1. Head & Shoulders Shampoo @ any supermarket / Guardian / Watsons
  2. Bleach, Gatsby Ex Hi Bleach @ Guardian / Watsons

Do try it and let me know your views or questions

Let Changing colour be your bestfriend

Faith.Love Feline


Wednesday 16 July 2014

Hair - Loco on Manic Panic


Loco on Manic Panic


Love Tish & Snooky's Manic Panic Semi-Permanent Hair Colour (Click HERE to their amazing website)

An amazing hair colour that doesn't dry out your hair. Instead it softens and adds brilliant shine. It is fortified with herbal and protein complex. Gentle on hair and contains no animal by-products.

My bestie was sharing with me what she discovered on Instagram. A hair product with loud bright colours and many users are in love with it. So us being crazy decided to google and find where in Singapore sells it. Got our hands on it and there is definitely no looking back for me.

It has been 3 months since I started using Manic Panic and has tried 2 colours, Cleo Rose and Atomic Turquoise. I have read up on internet how to apply it, how to keep colour stay longer, how to strip the colours out. 

Here's my take on the best way to apply Manic Panic!

                                                        Manic Panic Atomic Turquoise


Getting started:

To achieve intensely bright colours, apply it to pre-lightened to a very light blond. I personally had blond hair before so I didn't need to pre dye my hair but for those who needs to. Go to Guardian or Watsons and get Gatsby : Hair Colouring Series | Ex Hi Bleach, cost less then $10. 
  • Wash your hair with only shampoo (removing any hair products you used in the day and natural hair oil) no conditioner ,blow dry and apply the bleach. 
  • Once you have applied full head, cover your head with either a shower cap or cling wrap to keep the bleach from drying out and allowing heat to introduce into the mixture allowing it to quicken the process. 
  • Wash off after you have achieve a golden blonde. Shampoo, condition and deep condition. You hair needs all the nutrients back.
*best to use Head & Shoulders Anti Dandruff Shampoo, it cleans out all residue on your hair n strips out unwanted yellowish tint.

Now I would recommend dyeing Manic Panic only on the next day, like I said your hair needs to recover and attain some of its moisture and oil back. Bleaching is harsh on hair strands, making strands weaker and thinner.


Things you need: 
  1. Manic Panic semi-permanent hair dye
  2. Vaseline
  3. Hair clips
  4. Plastic gloves
  5. Shower cap or cling wrap
  6. Dry hand towel


Here's how:
  1. Shampoo your hair, no conditioner, blow dry.
  2. Tie your hair up half. .
  3. Apply Vaseline to hair line and around ears. Preventing the areas from getting coloured, Manic Panic colours stays on skin in just a few seconds.
  4. Wear your gloves.
  5. Apply from the bottom half first and work your way up to hair crown. Tilt your head sideways, let your hair naturally fall and apply Manic Panic. This allows you a better view for your back hair. 
  6. Once you have done the bottom part, half the undyed hair. Sectioning your hair makes DIY dyeing much easier.
  7. Keep tilting and applying and sectioning your hair until your full head is covered with the dye. 
  8. Roll your hair up, twist and roll into a bun and secure it.
  9. Now use the dry hand towel to clean around your hair line and ears, removing any hair dye.
  10. Cover your head with a shower cap or cling wrap.
  11. Leave it on for 30mins or as long as you like. This dye will not leave you bald if you leave it for hours. haha meaning its not as harsh as normal hair dye. I personally leave it for 1.5hrs.
  12. Wash off using warm water, shampoo (use gentle cleanser shampoo) and condition.
  13. Dry your hair and enjoy the softness of your new vibrant coloured hair!

Now you have dyed, here's how to maintain the colour for longer life:
  • Non Sulfate Shampoo - buy non sulphate shampoo.
          *shampoo containing sulphate cleans your hair thoroughly, in this case it strips 
            your hair colour faster.


  • Conditioner - mix 1part Manic Panic hair dye - 4parts conditioner. 
                             - Shampoo, rinse, towel dry, apply mixture conditioner and let it sit for 5-10mins

          * you will be conditioning while reapplying hair dye that was lost during the  
            shampoo process.
  • Do not wash your hair too often. Wash your hair every 3 days. Washing your hair more often means you are promoting the striping of hair colour. Yes we living in Singapore is hot n humid and we wash hair real often, some washes hair twice a day. Unless you are constantly sweating then it's not a problem. Our hair needs to produce natural oil to condition the scalp. If you have to wash everyday then reduce the frequency of hair washing to once per day.
Where to buy - 77th Street, Bugis Junction & AMK Hub


I hope you will love Manic Panic as I did.

Let Manic Panic be our bestfriend 

                 
Faith.Love Feline